Article sections
The aim of this guide is to give you an introduction on how to setup Betaflight on your BrainFPV flight controller and to get you in the air as quickly as possible. It isn’t intended to be an in-depth guide about every detail of Betaflight. There are many videos on YouTube on those topics that you can explore after completing this guide.
Warning: When updating or configuring your flight controller, leave the battery disconnected and if the battery is connected (e.g. for testing motors), remove the propellers. Spinning propellers can cause serious injury and it is best to never work on a quadcopter (or other RC aircraft) with the battery and propellers attached!
Install Betaflight Configurator
In order to setup and configure Betaflight, you need the Betaflight Configurator. You can download it from here.
Updating (flashing) Betaflight
Your BrainFPV flight controller is flashed with the latest stable Betaflight release during testing, which means that it may be outdated when you receive it and should be updated. To update Betaflight, do the following:
RADIX 2 and Newer Flight Controllers
The latest generation of BrainFPV flight controllers (starting with RADIX 2) use a custom BrainFPV bootloader for easy updating of the installed firmware. When the flight controller is in bootloader mode, it will appear as an external drive when connected to a computer and the firmware is updated by simply copying the firmware file to the drive. This has the advantage that no special drivers are needed for updating the firmware. See here for more information.
Older (F4 based) Flight Controllers
For older flight controllers (BRAINRE1, RADIX, RADIX LI), use the Betaflight configurator to flash the firmware as follows.
- Download the hex file for your flight controller from the Logo Customizer page. Simply click on your favorite logo (or make your own!) and download the hex file for your flight controller (“RADIX” for RADIX, “BRAINRE1” for RE1, etc.). Alternatively, you can find older and testing releases on the GitHub release page.
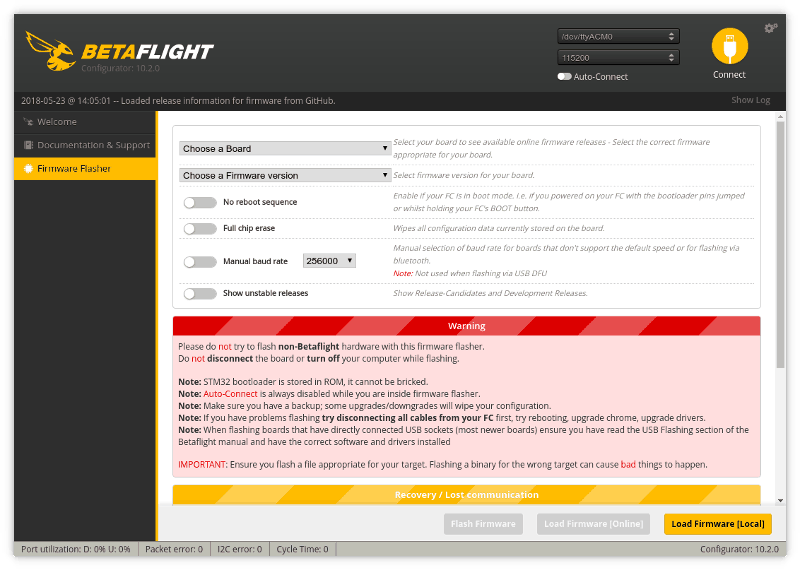
- Start the Betaflight Configurator and click on “Firmware Flasher” on the left side.
- On the bottom, click on “Load Firmware [Local]” and select the hex file you downloaded in Step 1.
- On the bottom, click on “Flash Firmware”. This should initiate the flashing process. If it doesn’t work (e.g. if you get a “Could not connect to bootloader” error), you may have a driver problem. See below.
Fixing Driver Problems
If flashing doesn’t work and you get a “Could not connect to bootloader” error, you most likely have a driver problem. On Windows use the “driver fixer” to resolve this problem. See this guide for more information.
Entering DFU Mode Manually
If Betaflight is working as expected, your flight controller will automatically reboot into DFU (boot) mode when you click on “Flash Firmware”. However, if Betaflight isn’t working, e.g., due to corrupted settings or if you accidentally flashed your flight controller with hex file made for a different flight controller, this will not work and DFU mode has to be entered manually before you click on “Flash Firmware”. To do so, do the following:
- Disconnect your flight controller from power and USB.
- On RADIX connect the “BOOT” pad on the bottom of the flight controller to the 3.3V pad at the same location on top. If you have an RE1 flight controller, you need to connect the two small pads on the bottom of the flight controller labeled “BOOT”. We recommend to use tweezers to temporarily connect the pads, as soldering to them can damage the flight controller.
- Connect your flight controller to USB.
- In the Betaflight Configurator, you should now see a “DFU” device where the serial ports are listed (top right of window).
- Flash the firmware by opening the hex file and clicking on “Flash Firmware”, as described above. If you want to reset your settings, make sure “Full chip erase” is enabled.
- After you have successfully flashed the firmware, disconnect the flight controller from power and USB and remove the connection between the BOOT pad and the 3.3V pad.
Basic Betaflight Configuration
Once you have updated Betaflight to the latest version, you are ready to configure your flight controller. So let’s get started 🙂
Configuring the Serial Ports
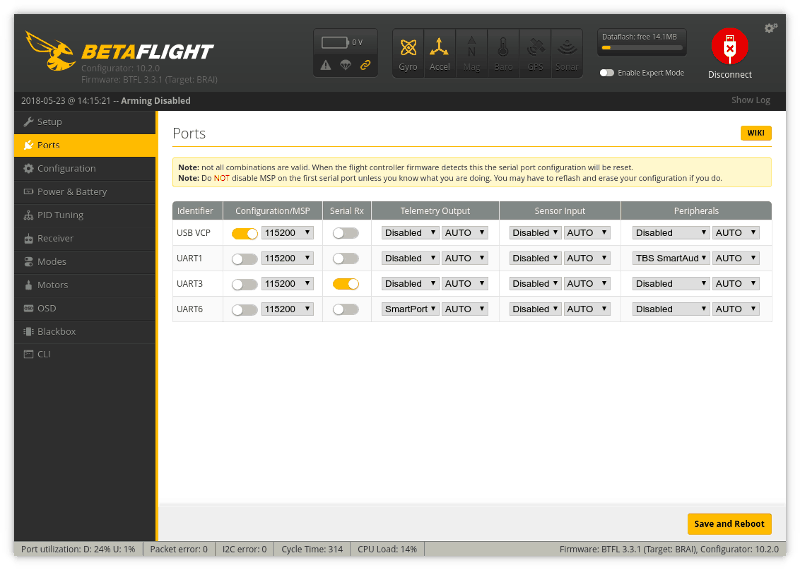
The first step is to configure what you have connected to each serial port (called “UART”). Here we assume the connections suggested in the hardware manual. Namely:
- The receiver signal is connected to RX3, TX3, or both. Depending on what type of receiver you use. Note: If you use an FrSky FPort receiver connected to TX6, enable “Serial Rx” for UART6 instead of UART3.
- If your receiver has a separate telemetry wire (e.g. FrSky S.Port) it is connected to TX6.
- If you use SmartAudio or the IRC Tramp protocol to configure your video transmitter, the wire is connected to TX1.
Note that if you use a PPM receiver, leave “Serial RX” for UART3 disabled. The number after RX/TX on your flight controller indicates the UART, e.g., RX3 is the RX pad of UART3. Consequently, for this configuration, the Ports tab in the Betaflight Configurator should look as follows. One you have configured everything, click on “Safe and Reboot”.
Configuration
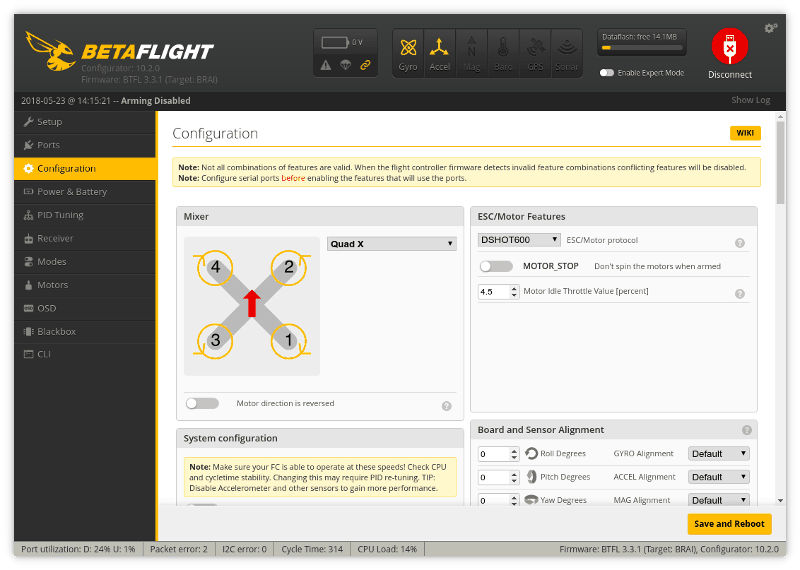
Next, we open the configuration tab. Here, we configure the following:
- If you are using a serial receiver (not PPM), select “Serial based receiver” under “Receiver” and select the protocol your receiver uses. E.g., SBUS for S.Bus, CRSF for TBS Crossfire, etc.
- If you are using Telemetry (e.g. FrSky S.Port), make sure to enable “TELEMETRY” under “Other Features”. Note that if you are using a Spektrum SRXL receiver connected to a TX pin (e.g. TX3), TELEMETRY needs to be enabled as well, otherwise the receiver won’t work.
- Assuming you are using motor controllers (ESC’s) that support the DSHOT protocol, select DSHOT600 under “ESC/Motor Features”.
- If you want additional features, such as LED’s (e.g. the ones on the RADIX PB), enable them under “Other Features”.
This assumes you are using a quadcopter with the normal Betaflight motor order and direction. If you are using a different configuration, you will need to change the settings under “Mixer” in this tab.
Note: If you are using a FrSky FPort receiver connected to TX6, click on the CLI tab on the left and copy-paste the following, otherwise your receiver won’t work correctly:
set serialrx_halfduplex = ON
set serialrx_inverted = ON
save
Configuring your RC Receiver
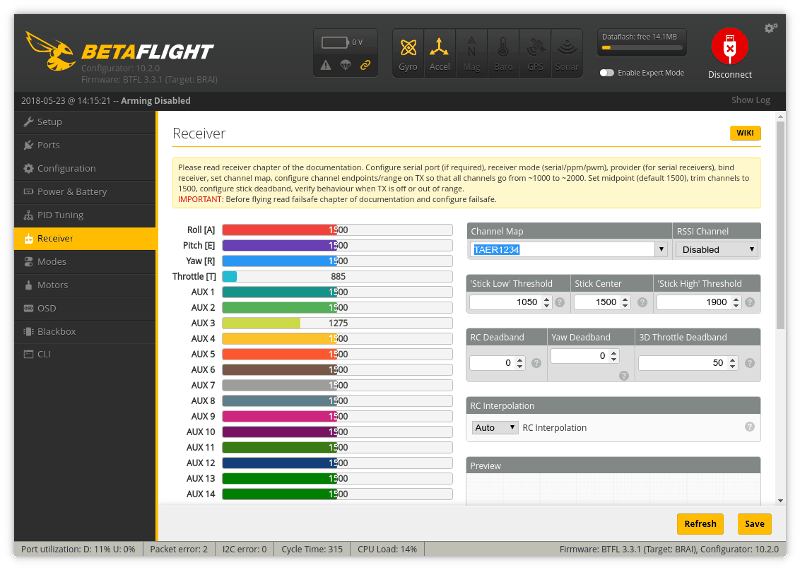
It’s always a good idea to first verify that your receiver is working correctly and that the channel mapping is correct. To do so, make sure your RC receiver is powered and bound to your RC transmitter. Your flight controller will power the RC receiver when connected to USB, so there is no need to connect your battery at this point.
Go to the Receiver tab and verify that the correct bars move when you move the sticks of your RC transmitter. When centered, the values should be 1500. If they are not, use trim or stick calibration on your RC transmitter to center them.
If the channel mapping is incorrect and the movement of the virtual quadcopter on the bottom right doesn’t correspond to the movements of the sticks on your RC transmitter and the bars moving are not the right ones, you will need to adjust the “Channel Map”. In the example below it is set to “TAER1234”, which means channel 1 is Throttle, channel 2 is Aileron (roll), channel 3 is Elevator (pitch), and channel 4 is Rudder (yaw). The other channels are used for switches.
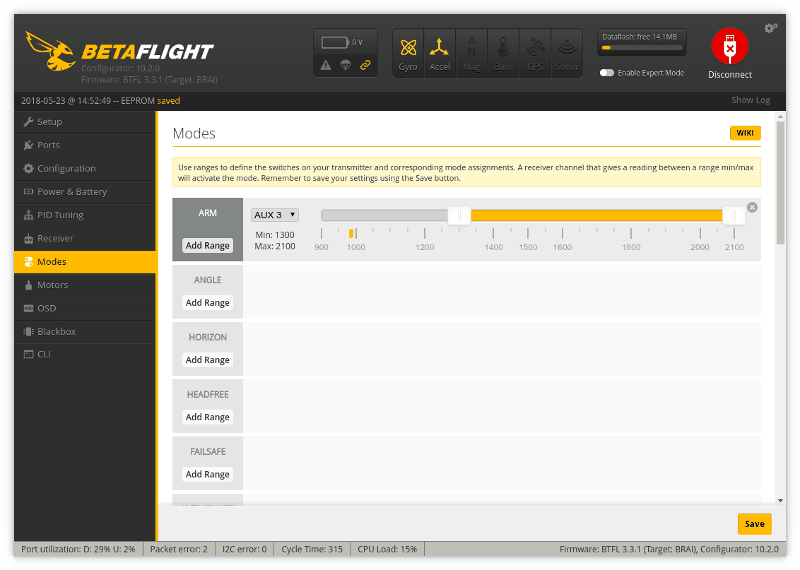
Setting up Switches
Switches on your RC transmitter can used to enable or disable things like the buzzer etc. At the very least, you need to configure a switch to arm / disarm your quadcopter. To do so, go to the “Modes” tab, click on “Add Range” under “ARM”, and toggle the switch that you would like to use on your RC transmitter. You should see the yellow dot moving. If it doesn’t, double check the configuration of your RC transmitter and make sure the switch is sent over a channel. If it does move, use the slider to set the minimum and maximum of the switch positions for which your aircraft should be armed (the yellow dot should be outside of the yellow range when the switch is in disarm position and well within it when it is in arm position).
Use the same method to configure other switches, e.g., for a buzzer, etc. Note that you can use the same switch for multiple functions by configuring the ranges of different modes accordingly.
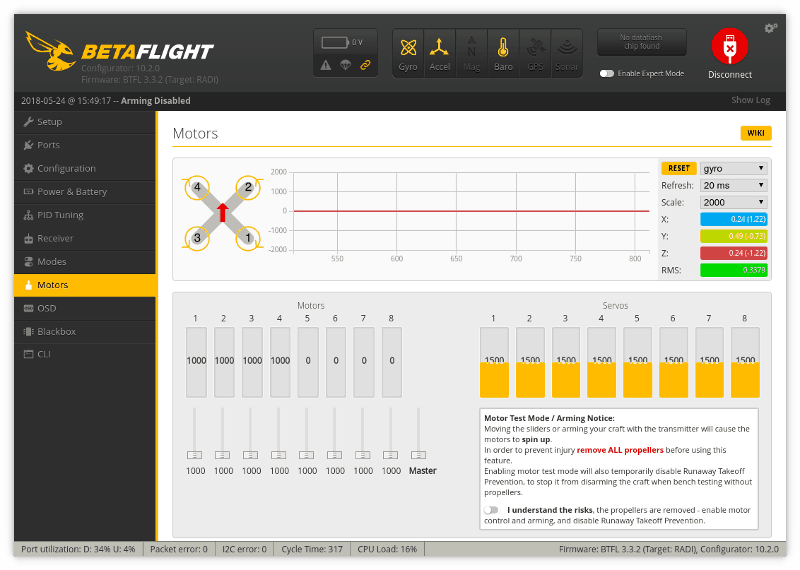
Testing the Motors
Before your first flight, it is a good idea to make sure your motors are working and are spinning in the correct directions. First, remove the propellers, as they can cause serious injury. Then, connect the battery to your quadcopter and go to the “Motors” tab of the Betaflight Configurator. Enable the “Motor Test Mode” and use the sliders underneath the “Motors” on the left to spin each motor individually. Verify that the motor order and directions correspond to the the order shown in the top left corner. If some motors are spinning in the opposite direction, configure your ESC’s (motor controllers) to reverse the direction or swap 2 of the 3 wires connecting your ESC and motor.
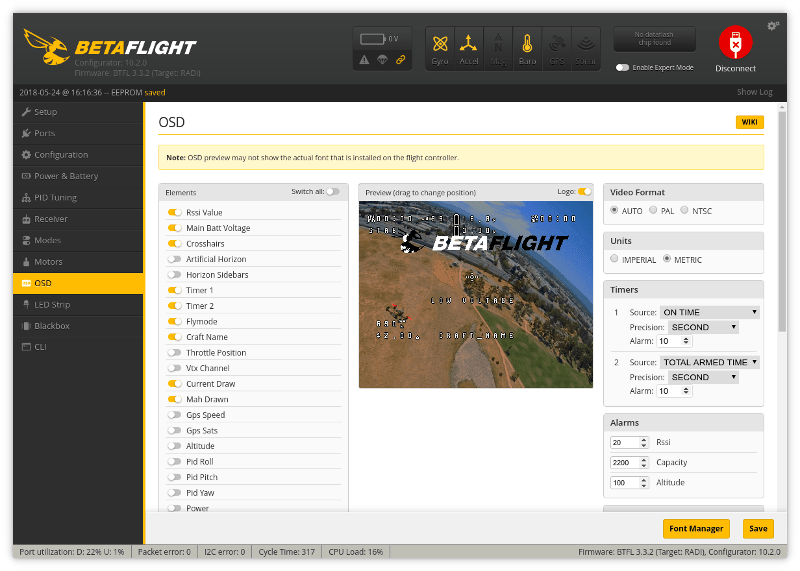
OSD Configuration
Your BrainFPV flight controller includes a unique full-graphic OSD, so naturally you should set that up as well. To do so, click on “OSD” on the left side. In the OSD tab, enable or disable the elements that you want to see and arrange them on the screen (use your mouse to drag them around). It’s a good idea to use your FPV goggles to verify the position in the real video. Once you are happy, click on “Save”.
Maiden Flight
After you have configured everything and verified that your RC transmitter / receiver as well as the motors work correctly, it’s time for your maiden flight. Re-install your propellers, go to an open field and fly your quadcopter! Side note: If you have never flown a quadcopter before, it is a good idea to practice on a simulator first. This will reduce the number of broken propellers on your first day ;). Once you have completed your maiden flight, you can start tuning your quadcopter to improve its flight performance.
Tuning Your Quadcopter
If your quadcopter doesn’t fly great using the default PID parameters, it is necessary to tune it. Tuning quadcopters is not an easy task, especially for a new pilot. If you fly with more experienced pilots, it is a good idea to ask them for advice. StingerSwarm also made a great video that explains his PID tuning procedure. You can see the video below.
Extra Features
Here are instructions on how to enable and configure some extra optional features.
BrainFPV gOSD Features
(BrainFPV OSD manual coming soon – 10/23/2018 – jenni)
Programmable RGB LEDs
Programmable LEDs are fun.. they can be configured to shine in any color, blink, etc. Your flight controller is designed to work with WS2812B compatible LED’s that can be purchased separately. The RADIX PB already includes 4 LEDs that can be programmed, but of course you can add more (up to 32 total).
To configure the LEDs, do the following:
- Go to the “Configuration” tab and enable “LEDSTRIP” under “Other Features”. Then click on “Save and Reboot”.
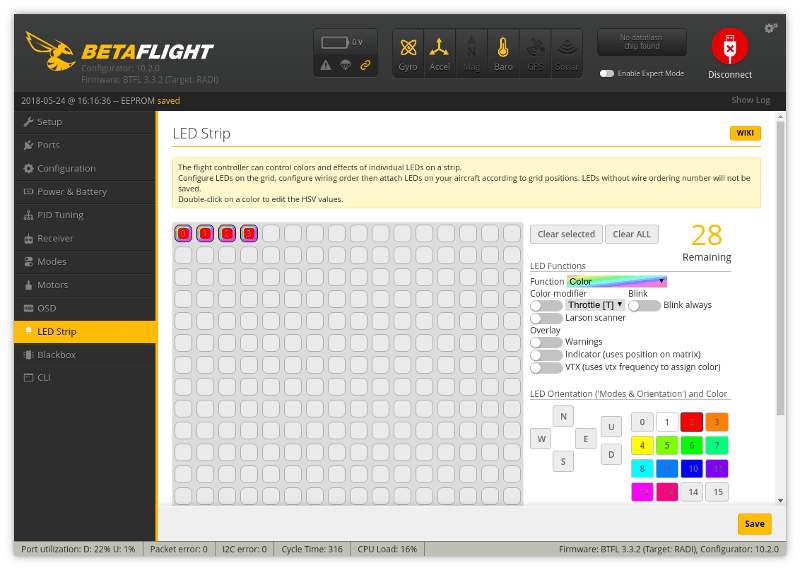
- On the left side of the Betaflight Configurator, you should now see a “LED Strip” tab. Click on it.
- Click on “Wire Ordering Mode” on the bottom right and select the groups of LEDs you have in the grid. Where in the grid they are doesn’t matter, but you could e.g. select for groups with 5 LEDs each if you have 5 LEDs on each arm. If you just use the RADIX PB with 4 LEDs, select a single group of 4 LEDs.
- After the LEDs have been selected click on “Wire Ordering Mode” again to disable the wire ordering mode.
- Select the LEDs of a group and configure them on the right side. For example. set “Function” to “Color” and click on the red button on the bottom. This will configure your LEDs to be always on and shine red.
- Click on “Save” to save and apply the changes.
There are many options available and you should experiment. You can e.g. have the LEDs use a different color when you quadcopter is armed, change color with the amount of throttle, etc. Enjoy 🙂