Have you ever been annoyed by having to fiddle with dip-switches and buttons to configure your FPV video transmitter?
We have. And it sucks. So we’ve added a new feature to BrainFPV RE1 that allows you to easily configure your FPV video transmitter through the on-screen display (OSD) menu with no fuss. This feature currently works with video transmitters by Team Blacksheep and is essential for FPV racing and just awesome for FPV in general.
Why do we need different frequencies?
Video transmitters for FPV come in a variety of shapes and sizes from numerous manufacturers. The most popular ones operate in the 5.8GHz ISM band, which is the same band that is often used for WiFi and goes from 5725MHz to 5875MHz, so there is a total of 150MHz available. A typical analog FPV video feed requires about 20MHz of bandwidth and we need some frequency spacing between the feeds, so only 4 or 5 pilots can typically fly at the same time. This means that the FPV video frequencies have to be carefully allocated and pilots often need to change the frequency before they can fly.
If two pilots accidentally use the same frequency (or two frequencies that are too close together), there will be interference, and possibly casualties (of your drone).
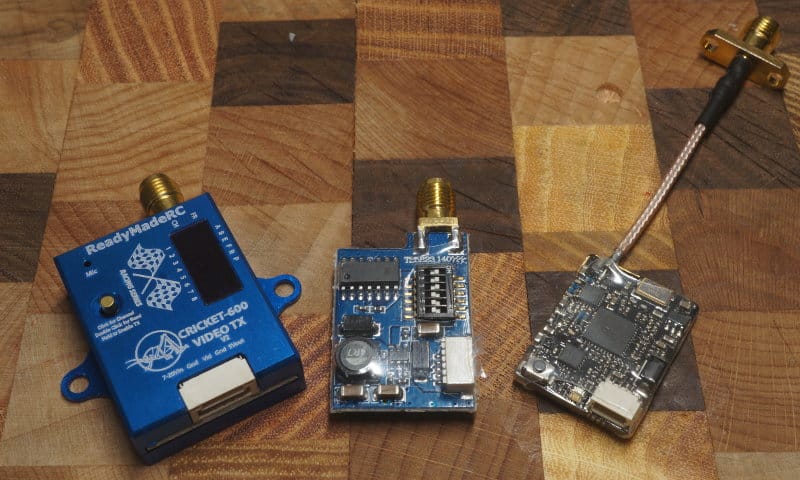
Most FPV video transmitters allow changing the channel (i.e. frequency) using dip-switches or a button with LEDs to indicate the selected channel. The photo below shows some typical video transmitters.
Buttons and dip-switches suck
As you know, figuring out what frequency (or channel) you are on, and how to select a specific channel often requires some mental gymnastics and consultation of the video transmitter manual, which is super inconvenient. There is also the danger of being accidentally on the wrong frequency causing interference for another pilot who may already be flying (not a good way to make friends).
Enter Team Blacksheep SmartAudio
The Team Blacksheep (TBS) guys also got fed up with dip-switches and buttons, so they released video transmitters with support for “SmartAudio”, which allows other devices to configure the video transmitter through the audio cable. This technology is used in the TBS Core Pro OSD and the popular TBS Vendetta racing quadcopter, where the video transmitter channel and transmit power can be changed using the OSD menu.
However, until now, pilots who wanted to build their own custom racing drone had to resort to dip-switches and buttons, which feels like being in the stone age after having gotten used to configuring the video transmitter through the OSD menu with the TBS Vendetta.
Fortunately, the folks over at Team Blacksheep are awesome and sent us the specifications for their “SmartAudio” standard, so we could add it to the BrainFPV RE1 OSD. A few sessions of coding later, we added the “VTXConfig” module to dRonin (see GitHub pull-request). This feature works with both the “TBS UNIFY PRO 5G8” and the “TBS UNIFY PRO 5G8 HV” video transmitters.
Excited yet?
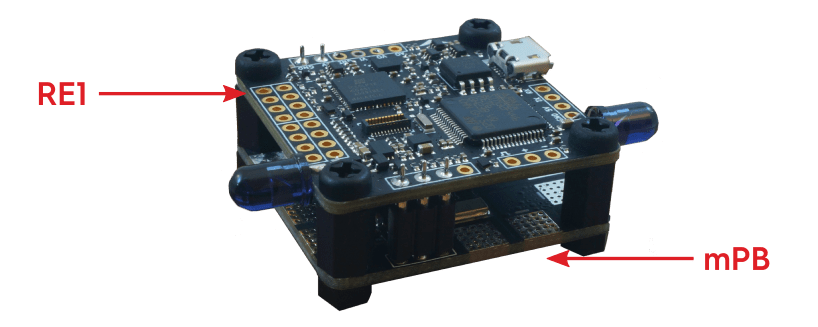
Setting it up couldn’t be simpler: Connect the audio signal to the Tx pin on the Serial Port of RE1 (or the Tx pin on any serial port of Brain, the previous generation product) and set the port to “VTX Config TBS SmartAudio”.
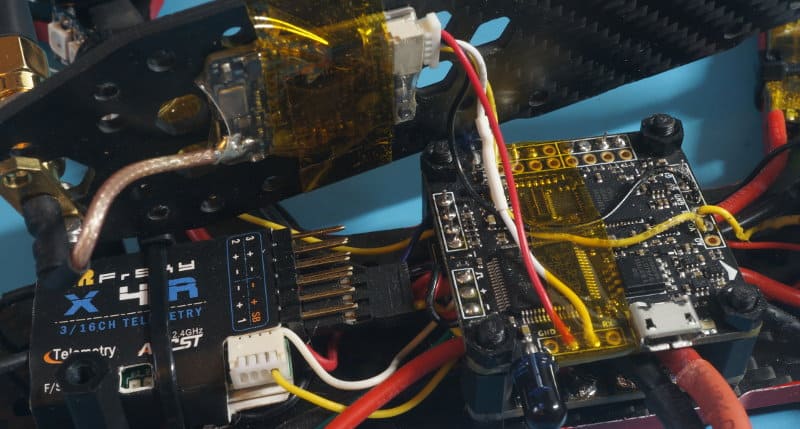
Note: The picture above shows the connection of a TBS – Unify Pro (not HV), which is powered by 5V. If you use the HV version, connect it to the “F output” of mPB to power the Unify Pro HV. Also, SmartAudio is only supported on SerialPort (UART1 in Betaflight).
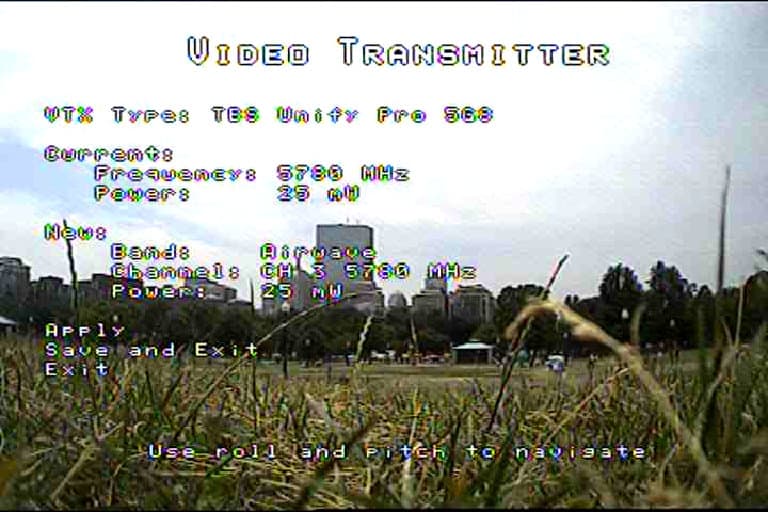
After rebooting RE1, you will be able to configure the video transmitter through the OSD menu and display the frequency as well as the transmit power in the OSD:
Done and done. Yet another feature that no flight controller currently can do, but RE1. Welcome to the future.
Fly on :).
Martin
Are there plans to work with UBAD’s new LaForge VTx? Also, FlySight has a VTx with PPM control.
We may definitely add different video transmitters in the future.
This feature has proven to be super useful. Can I still connect the microphone to the VTX audio in to transmit sound?
I would like a reply to this also. Can both be used? The microphone and VTX audio config on same wire.
Trappy (from TBS) replied here: http://fpvlab.com/forums/showthread.php?46112-TBS-VENDETTA/page12 (post #116).
“smart audio is an exchange protocol between the VTX (TBS UNIFY PRO) and the OSD (TBS CORE PRO). It uses the audio channel to open a full duplex (back and forth) connection between the VTx and the OSD, to allow you to set the VTx channels and output power. So you can either change channels via OSD, or hear sound.”
So, no, either Smart Audio or mic audio, not both. I’ve read there is a way to re-solder a bridge somewhere to go back and forth, but that’s not very practical for switching tp/from audio frequently.
Is this supported in the Betaflight target for the RE1?
I’m trying to figure this out as well, doesn’t look like betaflight currently had support for this?
Not yet, it should be available in 3.1 that will be out soon.
Is there an updated wiring diagram for this mod? The TBS UNIFY PRO 5G8 uses only 5V. The picture seams to indicate that it the transmitter is drawing power from the serial port output. I’m also planning on using a Fat Shark CMOS camera which is limited to 5V as well. Can I use any 5V power supply on the RE1 or mPB or is there a specific one recommended?
Thank you,
Yes, the Unify Pro is connected to the 5V pin on serial port; which is internally connected to the 5V input to RE1, so it’s the same as connecting the Unify Pro to mPB. If possible, I would recommend connecting the Unify Pro (not HV) directly to the 5V output of mPB in order to reduce the current flowing through the flight controller. If you have a 5V camera, you can also wire it to the 5V output of mPB (in parallel to the Unify Pro).
Thank you so much! That’s how I’ll wire it up.
The RE1 works perfect with the Tramp HV in BF 3.1.0RC10! Put the Telemetry Wire of the Tramp on UART 1 or 6 on TX, chosse in BF “IRC Tramp” – thats it 🙂
Go to your OSD in “Features” and here we go!
Just to be clear. Betaflight 3.1 is now supporting the configuration of the VTX through the OSD?
Yes. Unify and Tramp. Others should follow.
PSA/Clarification:
The wiring in the illustration shows the 5V of the Unify connected to the 5V rail on the FC. Be aware that this is not for the Unify HV. On the HV it is a 5V out line. I did not realize the difference between the two Unify models and wired it in as shown. I’ve been having some issues recently with the bottoms lines of the OSD disappearing (and more recently with the FC rebooting in flight or at least while armed) and was wondering if there was some conflict between the two or if having the two connected has somehow, over time, damaged my 5V rail or some component on it. It’s not like connecting two 5V batteries in parallel, as switching power supplies can interfere with each other. I disconnected it to try and troubleshoot it, and still had the FC do an in-flight reboot (and crash).
How do you access the menu in the osd to do changes using dronin I was able to find the answer for betaflight ( yaw to the left and pitch forward) but no info on how to do it in dronin its fine to have this feature and the osd looks great but I’ve wiggled the sticks on my Taranis all over and I can’t get to (where it shows in the video) the place that you can make changes
Just went out with my new 170 Spider Byte for the maiden flight and wow it is so cool, used dRonin for the first time the setup was a bit iffy at first.
I had to download the previous version “Quixote” (you can download it here – https://github.com/d-ronin/dRonin/releases/tag/Release-20161004.1 ) as “Artifice” did not work. don’t know what was wrong but with Artifice when I armed the quad only the back motors spun up I was going to go Betaflight but decided to try Quixote and it works great (when using dRonin you have to setup your failsafe on your receiver first here is a cool video to help you do that https://www.youtube.com/watch?v=r3CUE7fwj7Y …..well you don’t have to set it up but it helps ; )
Got the whole setup from BrainFPV even the “TBS UNIFY PRO 5G8 HV (SMA) Video Transmitter” it all works so well the quad is super responsive Soo nice .
The FPV on screen display menu thingie works great but they don’t tell you how to set it up anywhere on this website ?????
I had to research all over eventually found a mention of it on some blog can’t remember what it was but basically if your receiver has 8 channels Use 1 for throttle, 2 for roll, 3 for pitch, 4 for yaw, 5 for flightmode, 6 for accessory 0 , 7 for arming and 8 for rssi – then on dRonin go into the OSD tab at the bottom of the configuration page and in “Page Switch Settings” in the POS. 2 tab select Menu, then to the left of Pos. 2 you will see “Page Switch Function” select Accessory0. This will make your channel 6 switch change the OSD to Main Menu and then you can follow the lovely video they have on BrainFPV’s support TBS setup page which shows how to navigate the OSD menu but not how to get there.
But to get back to the hardware I have about 14 drones 9 are in flying condition lets just I have been building them for a while now, I have never seen such beautiful
circuitry before these are really well made boards well worth the money. Cant wait to see what Brain FPV come up with next ( lets just hope for better setup videos )
Awesome. Been searching for days and glad I came across your post. It works. Now why can’t BrainFPV add these instructions to their support page. If they have proper support, “we will come”. If they don’t, we will go somewhere else. Thanks hendrilieb.
I noticed the product feature of “Graphical OSD” and also 3D support – i.e. side by side operation with BlackBird or NerdCam products, which give you 3D graphics at your headset.
How flexible is this? I would really like to experiment with primitive 3D vector graphics, which responded to telemetry, and then run that signal back to my headset via the OSD. I’d like to program them myself.
Any chance this could be made to happen?
Also, will the betaflight feature detailed here: http://www.nitbeatfpv.com/frsky-taranis-pid-settings
be able to work with your flight controller? That would be pretty awesome if so…
The 3D support is for side-by-side 3D, i.e., the same OSD overlay is shown twice side-by-side once for each eye. You can adjust the position of the left / right overlay separately. You can’t do true 3D vector graphics with it.
Changing settings using taranis s.port with betaflight alreadt works (betaflight 3.1.x and newer).
Connection pictured shows TBS smart audio connected to the TX on the serial port, and the connection to SBUS on the receiver input. What is the BETAFLIGHT setting in ports? The connection to telemetry on the x4r is connected to UART6?
Set UART1 to SmartAudio to configure the video transmitter and UART6 to SmartPort telemetry :). Note that telemetry only works on UART6 and SmartAudio only on UART1.
Hola, necesito ayuda, tengo la brain fpv y un transmisor FRsky X4R, como conecto el smartport a la brain fpv? Gracias