Betaflight, BrainRE1

Betaflight on BrainFPV RE1

betaflight


 "Can I run Betaflight on RE1?"

You guessed it. This is our most frequently asked question since we announced BrainFPV RE1, the most advanced drone racing flight controller ever created. RE1 has a full graphical On-Screen Display (OSD), a powerful STM32 F4 processor running at 180MHz, and superior sensors, giving it unparalleled flight performance. 

Until now, dRonin has been the only supported firmware on RE1, so the answer to the above question has been a disappointing "No". Focus on the 'until now' part. Because things have changed and the answer is now:

"YES, RE1 can run Betaflight and it flies awesome!"

Before we go into the details, you may be asking yourself some questions, so let's get a few things straight. 

  • YES, dRonin will continue to be supported on BrainFPV RE1. We love dRonin and the functionality it provides.
  • YES, the OSD is supported in Betaflight. You can use the menu to change settings.
  • YES, BLHeli Passthrough is supported in Betaflight and works with RE1. 
  • NO, TBS Video Transmitter configuration is not yet supported in Betaflight, but will likely be available in version 3.1.
  • YES, RE1 has features that no other Betaflight flight controller has (graphical OSD, side-by-side 3D OSD, faster processor, trackmate lap timing, spectrograph).

OK, I think we covered all of your burning questions. Now that we got that out of the way, continue reading below for details on how to flash Betaflight on your RE1 and the differences in terms of supported features and configuration.

Flashing RE1 with Betaflight

RE1 ships with dRonin installed, so if you want to use Betaflight you will need to load Betaflight on it (aka. "flashing it", as the firmware is stored in Flash memory). Unlike other flight controllers running Betaflight, RE1 uses the dRonin bootloader, which is a small program that starts first and then loads either dRonin or Betaflight, depending on what firmware has been flashed onto RE1. When using Betaflight on RE1, the dRonin bootloader is still used, which has some advantages. Most importantly, the bootloader can always be accessed without the need of  "boot button" (which RE1 doesn't have) and it can also be used to start Betaflight in "Safe Boot" mode, which means all settings are set back to default. There are two ways to flash Betaflight on RE1:

1: Flashing using the Betaflight Configurator

This method is easy to use when you first receive RE1 and it hasn't been mounted into a multirotor or if Betaflight has already been flashed previously. If Betaflight has not been flashed onto RE1, you will need to access the pads labeled "BOOT" on the bottom of RE1 to enter the STM32 bootloader. To flash RE1, do the following:

  1. Download the latest "betaflight_*_BRAINRE1.hex" file from the BrainFPV Betaflight GitHub.
  2. Disconnect RE1 from power and USB.
  3. Short the pads labeled "BOOT" on the bottom of RE1. The easiest way to do this is to use tweezers or a paper clip.
  4. With the pads shorted, connect RE1 to USB. This can be a bit tricky, so you may want to ask your significant other to plug in the USB cable while you keep the pads shorted. If successful, the red LED on RE1 will turn on briefly and the blue LED will be on constantly after that.
  5. Start the Betaflight Configurator and click on "Firmware Flasher" on the left side.
  6. On the bottom right, click on "Load Firmware [local]" and select the "betaflight_*_BRAINRE1.hex" file.
  7. Enable the "No reboot sequence" option
  8. Make sure that "Full chip erase" is disabled
  9. Click on "Flash Firmware" and wait until the flashing finishes.

If you had already flashed RE1 with Betaflight before, you can skip steps "2, 3, 4", i.e., simply start the Betaflight Configurator, load the firmware you downloaded and click "Flash Firmware". Note: you may have to click the button multiple times until the flashing starts.

Important: Never select "Full chip erase" when flashing Betaflight. Doing so will erase the dRonin bootloader.

What do I do if I erased the dRonin bootloader?

  1. Download the "ef_brainre1.hex" file and save it somewhere.
  2. Follow the steps above to flash the ef_brainre1.hex file using the Betaflight configurator (select this file in step 6).

After this, your RE1 will have the dRonin bootloader restored and will be running dRonin. You can then flash it with Betaflight using the Betaflight configurator or the dRonin GCS. If you can't connect to Betaflight and want to erase the settings, use the "Safe Boot" method described below.

2: Flashing using the dRonin GCS

This method use the dRonin GCS and the dRonin bootloader to flash Betaflight on RE1. It is best used if you have already installed your RE1 on your multirotor and can't access the BOOT pads on the bottom. The dRonin GCS can also be used to load Betaflight in "Safe Boot" mode, which means all settings are set back to defaults. To flash your RE1 with Betaflight do the following:

  1. Download the latest "betaflight_*_BRAINRE1.tlfw" file from the BrainFPV Betaflight GitHub.
  2. Download dRonin and start the GCS.
  3. Disconnect RE1 from USB and power.
  4. In the dRonin GCS, go to the "Firmware" tab and click on "Rescue".
  5. Connect RE1 to USB. The dRonin GCS should connect to the bootloader and the green LED on RE1 will be pulsating slowly.
  6. Click on "Open File.." and select the "betaflight_*_BRAINRE1.tlfw" file. Note: you will need to adjust the file type filter to show all.
  7. Click on "Flash"
  8. Once the flashing is finished, you can click on "Boot" to start Betaflight.

Using Safe Boot: To reset all Betaflight settings to default, click Rescue (step 4 above), connect RE1 to USB and then click on "Safe Boot". This can be useful if the Betaflight settings become corrupted for some reason.

Betaflight Configuration

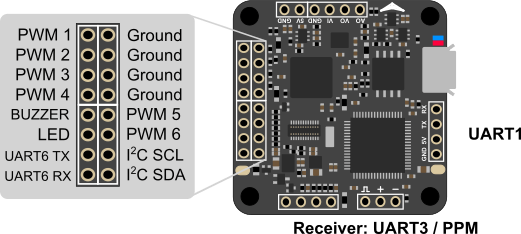
BrainFPV RE1 can be configured using the Betaflight Configurator like any other Betaflight flight controller. Note that version 1.8.3 or newer is required. Below we give some information on how to configure things that are specific to RE1. For a full description of ports on RE1, make sure to download the manual from the support page.

Ports

When using Betaflight on RE1, it has 6 PWM outputs to drive ESCs / motors and 3 serial ports. The receiver port is UART3 and the same pin can also be used for PPM input. This port features a hardware inverter for S.Bus receivers. The "UART6 TX" pin also features a bi-directional inverter for FrSky Smart Port or Sensor Hub telemetry. Inverters are automatically enabled if the corresponding receiver or telemetry type is selected.

re1_betaflight_ports

The configuration for a typical setup using a serial receiver (e.g. S.Bus or DSM) and FrSky Smart Port telemetry on UART6 TX is shown below.

re1_betaflight_ports_config

Voltage, Current, and RSSI inputs

RE1 has 3 analog inputs that can be used to measure the battery voltage, current draw, and RSSI (received signal strength indication). When used with BrainFPV mPB, the Voltage Scale is "66" and the current sensor scale is "250", which are the default values. The current sensor and analog RSSI inputs can be enabled under "Configuration" in the configurator.
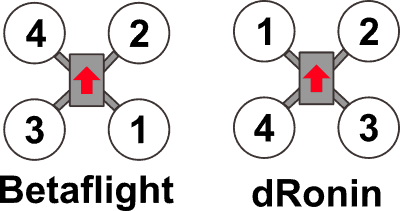
Motor Output Order

The default motor output order for a quadcopter in Betaflight is not the same as in dRonin, as shown below. This means if you have if you have wired your quadcopter to work with dRonin using the dRonin motor order, you cannot simply flash Betaflight and go fly (bad things will happen if you try). To use Betaflight you either need to re-wire your quadcopter to use the Betaflight motor order or you need to select "Quad X 1234" under Mixer in the configuratorwhich will make Betaflight work with the default dRonin motor order.

dronin_vs_betaflight_order


OSD and BrainFPV RE1 Specific Features

The OSD layout can be configured using the Betaflight configurator. A nice feature is the OSD menu that allows configuring the flight controller, including BrainFPV RE1 specific features, like the IR lap timing transponder and OSD settings. A stick combination is used to access the menu demonstrated in the video below.

The RE1 specific features can also be configured using the command line interface (CLI) in the Betaflight Configurator. Thanks to the OSD menu, it should rarely be necessary to change settings using the CLI. Some useful commands are:

set brainfpv_osd_sync_thresh = XXX Sets the threshold of the OSD video sync detector. You may need to change this if the OSD overlay flickers of disappears during fast bright/dark transitions. The default value is 120. Values between 115 and 125 are commonly used. Note: if you have an OSD overlay but it flickers, use the OSD menu to adjust this, as the threshold will be changed immediately without needing to save / reboot.

set brainfpv_ir_ilapid = XXXX Sets the ID of the I-Lap IR lap timing transponder. Large numbers can more easily be configured using the CLI.

set brainfpv_ir_trackmateid = XXXX Sets the ID of the Trackmate IR lap timing transponder. Large numbers can more easily be configured using the CLI.

Unique BrainFPV RE1 Features

BrainFPV RE1 is the only Betaflight flight controller with a full graphical On-Screen display. This allows it do do things that no other Betaflight flight controller can do. For example:

Spectrograph

Motor vibrations result in noise in the gyroscope data and are a common problem with multirotors. The good thing is that the vibrations typically occur at much higher frequencies than the signal of interest (the signal needed to actually control the multirotor), so filters can be used to suppress the noise. Betaflight uses low-pass and notch filters to suppress noise at certain frequencies. The filters can be adjusted by the user. Unfortunately, tuning the filters can be a lengthy process, as the gyro data typically needs to be recorded using blackbox, downloaded and then analyzed on a computer using Blackbox Explorer to compute the frequency spectrum. BrainFPV RE1 makes this much easier, as it can compute the spectrum in real-time and display it in the OSD.

The spectrograph needs to be enabled using the OSD menu, after which it can be accessed using a stick combination (shown on boot). Note: If enabled, the spectrum is always computed even if the spectrum is not being displayed in the OSD. This allows displaying the spectrum after a flight but it also means that it will increase the processor utilization, so make sure to disable it after you are done tuning. The video below shows the spectrograph in action.


Betaflight vs dRonin Feature Comparison

The following table gives an overview of what features are supported in dRonin and Betaflight. We will keep updating this table when new features are added.

Betaflight (v3.1.X)dRonin (2017-02-13, "Artifice")
PWM outputs6up to 8
Serial ports (including receiver)3up to 4
Rx inverterYesYes
Telemetry inverterYesYes
I-LAP transpoderYesYes
Trackmate transponderYesYes
Baro supportYes (OSD only)Yes (OSD, altitude hold)
Graphical OSDYesYes
OSD MenuYesYes
OSD Pages14
Side-by-Side 3D OSDYesYes
BLHeli PassthroughYesNo
TBS Vtx ConfigurationYesYes
Immersion RC Tramp Vtx ConfigurationYesNo
BuzzerYesYes
Programmable LEDs (WS2812B)Up to 32Up to 256
LoggingBlackbox (16MB flash, serial port)dRonin logging (16MB flash, serial port)
AutotuneNoYes
GPS NavigationNoYes


Got Stuck?

If you run into a problem with using Betaflight on RE1, make sure the checkout the resources on the support page. If you believe you found a bug in the code that is specific to RE1, please report it on GitHub.


14 thoughts on “Betaflight on BrainFPV RE1

  1. todd says:

    do’s this brainfpv re1 have a return to home built into it..

    1. Jeff says:

      No

      1. martin says:

        You can setup return-to-home if you use dRonin and add the RE1-Baro as well as an external compass and GPS. However, be aware that the setup is not very straightforward and return-to-home in dRonin is not not always 100% reliable, so it doesn’t let you set it up to return-to-home on failsafe etc.

        1. Larry Randall says:

          where can I find documentation on connecting gps and compass

  2. Keith Finley says:

    I’ve changed over to Betaflight and loaded the latest 3.1.3 hex and configured everything but I can’t seem to access the Brain menu page by using the yaw left, pitch up command. Right now I have no control over the TBS vtx or any of the other main menu items. Any ideas?

    1. Peter says:

      You are not alone… Same problem not getting into the osd with control stick movements. Also not reading voltage right… Betaflight won’t let me change the value.

      1. Eitam says:

        Did you guys manage to overcome this issue?

  3. Mp says:

    Where’s the Alt hold support for Betaflight?

    1. martin says:

      Betaflight is pretty much exclusively for racing, so altitude hold isn’t supported well (there is a mode, but it’s pretty much just still there from Cleanflight and not actively maintained or tested). If you need altitude hold, I recommend using dRonin on your RE1.

  4. David Poindexter says:

    I have mPB and still have voltage scale at 110; is this ok? The above directions indicate it should be at 66 is this normal?

    1. martin says:

      110 is correct for mPB V2, for the original mPB it was 66

      1. David Poindexter says:

        What is the Current Sensor Scale supposed to be? Thx

        1. martin says:

          250 for both the original mPB and mPB V2

Comments are closed.